
viaSocket Flow
Discover how to automate your workflows seamlessly with viaSocket Flow

The "Response" in viaSocket enables users to set responses for webhook URLs, dictating the behavior when the URL is accessed. Whether users prefer a default response provided by viaSocket or desire a customized response tailored to their specific needs, this feature offers flexibility and control over webhook interactions.
Key Features:
Default Response: viaSocket offers a default response option, providing users with a quick and convenient way to set a standard response for their webhook URLs. This default response can be easily configured within the viaSocket interface.
Custom Response: For users seeking greater customization, viaSocket allows the creation of custom responses. This feature empowers users to define the exact content and format of the response, enabling them to meet unique requirements and integrate seamlessly with their existing systems.
How it Works:
Users can select the default response option within the viaSocket webhook configuration.
The default response is automatically sent whenever the webhook URL is accessed, providing a consistent reply without additional configuration.
 Customizing Response:
Users have the option to customize the response according to their specific needs.
They can define the HTTP status code, content type, headers, and body content of the response.

Use Cases:
- Confirmation Messages: Set up default or custom responses to acknowledge receipt of webhook requests, providing users with immediate feedback.
- Data Validation: Utilize custom responses to validate incoming data from webhook requests, ensuring compliance with specified criteria before processing further.
- Error Handling: Configure responses to communicate errors or exceptions encountered during webhook processing, aiding in troubleshooting and resolution.
- Integration Support: Customize responses to align with the requirements of integrated systems or applications, facilitating seamless data exchange.
The "Response" in viaSocket empowers users to control and manage webhook interactions effectively. Whether opting for a default response or crafting a customized reply, users can ensure that webhook requests are handled appropriately, providing consistency, reliability, and adaptability to their automation workflows.
Webhook Response
Nov 8, 2024.png)
.png)

Triggers kick off the entire Automation by responding to a specific event or condition. When the trigger event or condition occurs, viaSocket detects it.

When setting up triggers on viaSocket, it connects to the API of the respective application to retrieve information about trigger events. viaSocket relies on the capabilities provided by that API. The type of trigger available (whether polling or instant) is determined by how the application's API is designed.
While Instant Triggers excel in real-time event-driven automation, Polling Triggers offer a different approach, particularly suitable for scenarios where real-time updates are unnecessary or impractical. Polling Triggers involve periodically querying an external data source, typically through APIs, to check for updates or new information.
Polling triggers involve regularly checking for updates or changes within an application at predefined intervals. Instead of responding immediately to events, these triggers periodically scan for new data or changes.
APIs (Application Programming Interfaces) serve as the bridge between different software applications, allowing them to communicate and exchange data. With Polling Triggers, viaSocket interacts with external systems through their APIs, retrieving relevant information at predefined intervals.
How Polling Triggers Work in viaSocket:
1. In a typical scenario, you will find Polling triggers of applications. For example, such as Notion, to trigger a workflow whenever a new item in the database is created.
.png)
2. At a regular interval of 15 mins, viaSocket sends API requests to the designated endpoints of the Notion, querying for updates or new data since the last query.
3. Upon receiving the API response, viaSocket processes the retrieved data, identifying any new orders or relevant changes.
4. Based on the processed data, viaSocket triggers the workflow that you set up, such as updating inventory records or sending order confirmation emails to customers.
More example:
Checking an RSS feed every 15 minutes for new blog posts and triggering an action when new content is detected.
Polling an e-commerce platform every hour to update inventory levels and trigger notifications when stock reaches a certain threshold.
Monitoring a social media account every 30 minutes for new mentions or messages and triggering automated responses.
In essence, viaSocket adheres to the capabilities provided by each application's API to determine the type of triggers available for automation. If an application supports webhooks, viaSocket can leverage instant triggers for real-time automation, whereas applications without webhook support will rely on polling triggers to periodically fetch updates.
By understanding the nuances of Instant and Polling Triggers and how they interact with webhooks and APIs, businesses can harness the full potential of workflow automation to streamline operations and drive growth.
Polling Triggers
Mar 22, 2025Embedding viaSocket into your application allows you to provide seamless automation features to your users, enhancing their productivity and extending the functionality of your platform. viaSocket offers a wide range of integrations with popular apps and services, enabling users to automate workflows and connect their favorite tools without leaving your application's environment.

Key Benefits:
- Seamless Integration: Embedding viaSocket enables users to access its automation capabilities directly within your application, eliminating the need for them to switch between multiple tools or interfaces.
- Extensive Integration Library: viaSocket offers integrations with thousands of apps and services, allowing users to automate tasks across a diverse range of platforms, including project management tools, CRMs, email marketing platforms, and more.
- Customization: You can customize the embedded viaSocket interface to align with your application's branding and user experience, providing a cohesive and seamless integration for your users.
How Embedding Works:
Embedding via viaSocket Platform:
viaSocket provides a platform for developers to embed viaSocket functionality directly into their applications.
Developers can use viaSocket's Embed SDK to integrate viaSocket components, such as the workflow editor or trigger/action selection, into their application's interface.
Authentication and Authorization:
Users authenticate with their viaSocket account within the embedded interface to access their existing workflows (automated workflows) and create new ones.
OAuth 2.0 authentication is typically used to securely authorize access to a user's viaSocket account from within your application.
Workflow Creation and Management:
Users can create and manage their workflows directly within the embedded viaSocket interface.
They can choose triggers (events that initiate workflows) and actions (tasks performed in response to triggers) from the available integrations and configure them to suit their needs.
Benefits for your users:
Integrating viaSocket into your app offers a multitude of benefits for your users, enhancing their experience and productivity while using your platform. Let's delve into the advantages they can enjoy:
1. Enhanced Connectivity:
By embedding viaSocket into your app, you provide users with seamless connectivity to a wide array of third-party applications and services. This means users can easily integrate their preferred tools and platforms with your app, expanding its functionality and versatility. Whether they need to sync data, automate tasks, or trigger actions across different systems, viaSocket integration ensures smooth interoperability.
📌 For example, if you are a project management app that integrates viaSocket. Users can seamlessly connect their project management tool with their preferred cloud storage service, such as Google Drive or Dropbox. This integration allows team members to access project documents directly from within the project management app, streamlining collaboration and ensuring all stakeholders have access to the latest files.
2. Streamlined Workflows:
One of the key benefits users derive from viaSocket integration is the ability to streamline their workflows. With automated processes facilitated by viaSocket, users can eliminate repetitive tasks and manual data entry, saving valuable time and effort.
📌 For example, if you are an e-commerce platform that embeds viaSocket. Users can automate order fulfillment processes by integrating their e-commerce store with their preferred shipping carrier. When a new order is placed, viaSocket triggers the creation of a shipping label and updates the order status in real-time, eliminating the need for manual data entry and ensuring orders are processed efficiently.
3. Increased Productivity:
The integration of viaSocket into your app leads to increased productivity for users. Real-time data synchronization ensures that users have access to up-to-date information across different applications, enabling them to make informed decisions and collaborate more efficiently. Whether it's accessing the latest sales figures from their accounting software or viewing project updates from their task management tool, users can stay productive without having to switch between multiple platforms.
📌 For example, if you are a sales CRM platform that integrates viaSocket. Users can automatically sync their CRM with their email marketing software. When a new lead is added to the CRM, viaSocket triggers the creation of a new contact in the email marketing platform, allowing users to nurture leads and send targeted email campaigns without manual data entry, leading to increased productivity.
4. Customization Options:
viaSocket integration offers users the flexibility to customize their integrations according to their specific needs and preferences. This means users can tailor the integrations to suit their unique workflows and business requirements. Whether they need to map custom fields, define trigger conditions, or specify actions, viaSocket provides the tools to create personalized integrations that align with their objectives.
📌 For example, if you are a task management app that embeds viaSocket. Users can customize their integrations by defining specific triggers and actions based on their unique workflow. Users can set up an integration to create a new task in the task management app whenever an email with a specific subject line is received, allowing for tailored automation that fits their needs.
5. Improved User Experience:
Overall, embedding viaSocket into your app enhances the user experience by providing seamless connectivity and automation. Users benefit from a cohesive workflow where data flows effortlessly between different systems, eliminating silos and improving efficiency. With viaSocket integration, your app becomes a central hub for managing data and processes, offering users a more intuitive and enjoyable experience.
📌 For example, if you are a customer support platform that integrates viaSocket. Users can seamlessly connect their support ticket system with their CRM and communication tools. This integration allows support agents to view customer history, communicate with customers, and update ticket status directly from within the support platform, providing a seamless and efficient user experience.
By leveraging viaSocket's capabilities, you can create a more valuable and engaging platform for your users, driving satisfaction and loyalty.
Embed
Nov 8, 2024.png)
In simple terms, a webhook is a way for one application to send real-time data to another application as soon as an event occurs. Think of it like a notification system. When something happens in one application, a signal is sent to another application, letting it know about the event. By using a webhook you can send data from any external application to viaSocket. Webhook acts as a trigger which triggers the whole flow every time a request is made to its URL.

The "Webhook" feature in viaSocket is a powerful tool that enables you to seamlessly trigger workflows, providing instant automation.
Step by step guide on how to trigger your workflow using Webhooks in viaSocket
Real-Time Responsiveness
Webhooks provide real-time responsiveness by allowing external systems or applications to notify viaSocket immediately when an event occurs. This eliminates the need to rely on scheduled intervals or manual triggers, ensuring that your workflows leap into action instantly.
📌 For example, let's say you have an e-commerce website, and you want to trigger a workflow in viaSocket whenever a new order is placed. By integrating a webhook, viaSocket can be notified instantly when the order is submitted, allowing your workflow to process the order without delay.
Copy Webhook URL and Save
Once you've added the Webhook block to your workflow, copy the generated webhook URL and save it. This URL acts as the endpoint that external systems or applications will use to trigger your workflow.

Link Webhook URL to External Platforms

📌 For example, if you're using a CRM platform to manage customer interactions, you can configure the platform to send a webhook request to the URL provided by viaSocket whenever a new lead is created. This will automatically trigger your viaSocket workflow to process the new lead information.
Test your webhook
You can view the incoming webhook data from your app. Refresh to view the updated data.

In summary, the Webhook feature in viaSocket provides a direct link to triggering workflows effortlessly, enabling real-time automation. By following simple integration steps, you can seamlessly connect external systems or applications to viaSocket and ensure that your workflows respond instantly to relevant events.
Webhook as Trigger
Nov 8, 2024Welcome to viaSocket, your go-to destination for streamlining workflows and automating tasks effortlessly. Today, we're delving into one of our core features: Automation. Think of Automation as the building blocks of your automated processes.

In this post, we'll walk you through what Automation are, how they work, and how to set them up for workflows.
- What are Automations?
- How Automations work?
- Setting up Automations in viaSocket
1. What are Automations?
Automation in viaSocket is the playground for workflow automation, its main purpose is to help users create workflows. They allow you to connect different apps and services, enabling data to flow between them and triggering actions based on specific events or conditions.
📌For instance, let's say you receive a new email in your Gmail inbox containing an attachment. With viaSocket, you can create an Automation that automatically saves that attachment to your preferred cloud storage service, such as Google Drive or Dropbox. This eliminates the need for manual intervention and streamlines your workflow.
Automations in viaSocket are highly customizable, allowing you to tailor automation workflows to fit your unique needs and preferences.
2. How Automations work?
Let's break it down into two simple parts: triggers and actions.
Triggers: The Starting Point
They kick off the entire Automation by responding to a specific event or condition. For example, a trigger could be receiving a new email, a form submission, or a new entry in a spreadsheet. Once the trigger is activated, it sets the Automation in motion.
Actions: Tasks to be executed
Actions are the next steps in Automation. Once the trigger sets things in motion, actions come into play to perform specific tasks or operations. These tasks could be anything from sending an email, creating a calendar event, updating a database, or posting on social media.
Putting It All Together
Imagine you want to automate the process of sending a "thank you" email every time someone signs up for your newsletter. The trigger would be the new subscriber joining your list, and the action would be sending the "thank you" email automatically. Together, these make up an Automation that saves you time and effort.
You can set up multiple actions to be executed sequentially, each performing a specific task or operation. Imagine you want to streamline your customer onboarding process. You can set up an Automation where a trigger, like a new customer sign-up, initiates a series of actions: sending a welcome email, adding their information to your CRM system, and assigning a follow-up task to a team member.
3. Setting up Automation in viaSocket
Let’s set up an Automation to integrate Typeform with Slack such that whenever a new entry is made in Typeform, this connection automatically sends a message to a special Slack channel. This helps everyone stay informed about new business opportunities without having to do it manually.
Step by step guide to create workflow to send Slack channel message for every Typeform entry
- Decide where you want to set up your Automation. If you have existing projects, choose one. Otherwise, create a new project.
- Click on Create New Automation.
- Choose Your Trigger: Look for Typeform in the triggers list, choose "New Entry in typeform" to trigger the Automation when a new deal is created. Select the form you want to automate. Authorize and test it to ensure it works, then click on create.
- Select Your Action: Search for Slack in actions, select "Send Message in Channel," pick the channel where you want the message to go. Customize the message content using information from the new deals in Pipedrive. Test it, and click on update to include the action in your workflow.
That's it! Once you've chosen your trigger and action, your Automation is set up and ready to go. You can now click on "Make Live" to publish your Automation and activate it.
Automations are the heart and soul of viaSocket, enabling you to automate tasks, streamline processes, and unlock new levels of efficiency. Whether you're a seasoned pro or just dipping your toes into the world of workflow automation, Automations are your ticket to smoother, more productive operations. So why wait? Dive in and start building your first Automation today!
Automations
Nov 8, 2024.png)
.png)
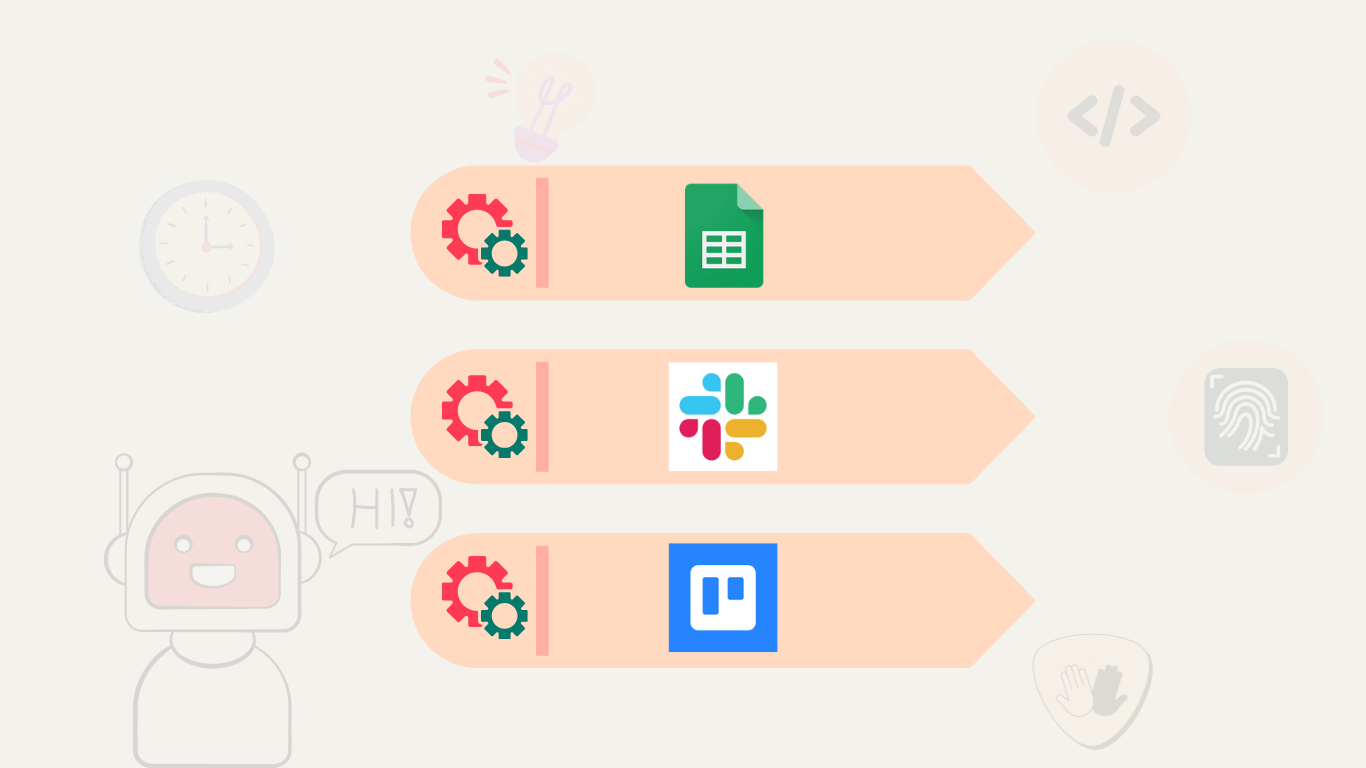
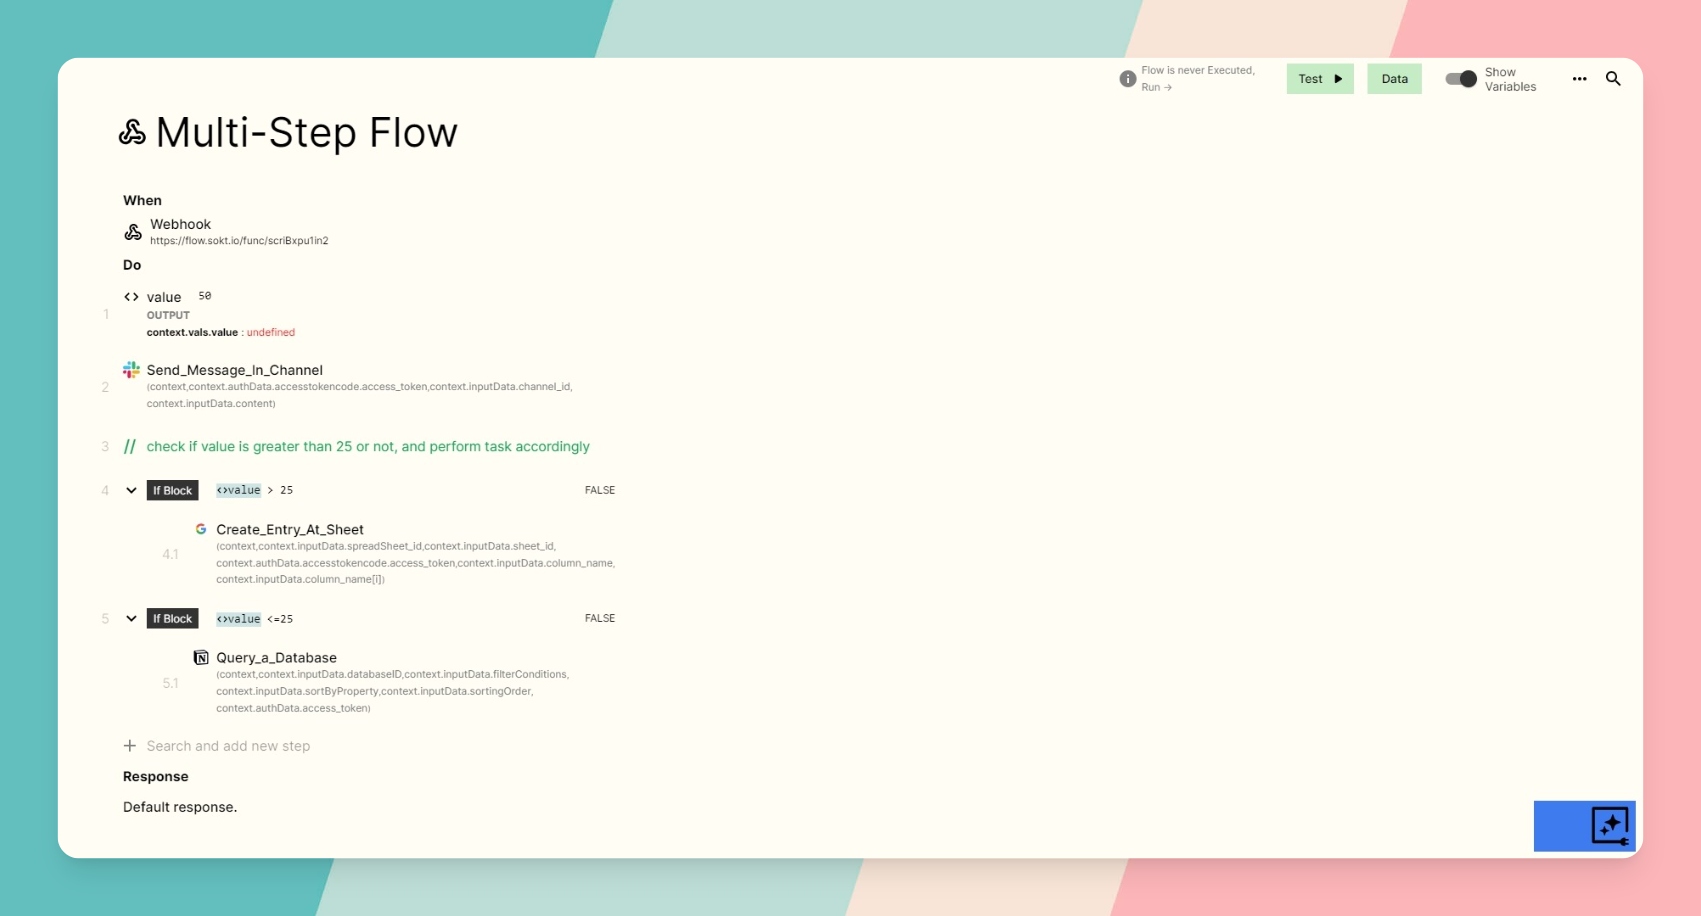
A multi-step workflow in viaSocket is a sequence of actions that are executed in a specific order to achieve a particular goal. These workflows are ideal for automating complex tasks that require several steps to be completed. Multi-step workflows can streamline processes, reduce errors, and improve efficiency by automating repetitive tasks. You can even change the order of these steps easily using the drag and drop feature of viaSocket.
Features of Multi-Step Workflow:
1. Sequential Execution:
Multi-Step workflows allow you to arrange actions in a specific order, ensuring that each step is executed sequentially.
2. Conditional Logic:
You can incorporate conditional logic, such as IF Conditions, to create dynamic workflows that respond to different conditions.
3. Monitoring and Tracking:
viaSocket offers monitoring tools called Logs and Metrics that allow you to track the progress of a multi-step workflow in real-time, view the status of each step, and identify any issues that may arise.
4. Customization:
Multi-Step workflows can be customized to suit your specific requirements, allowing you to tailor them to your unique workflow needs. You can add any third-party applications in the flow and can also change the order of these steps.
Step by step guide on how to make multi-step workflows in viaSocket
How to create a Multi-Step Workflow in viaSocket?
- Identify the Steps: Start by identifying the individual steps involved in the workflow. Break down the task into smaller, manageable steps.
- Arrange the Steps: Arrange the steps in the order in which they need to be executed. Consider dependencies between steps and any conditions that need to be met.
- Test the Workflow: Before deploying the workflow, test it to ensure that each step is executed correctly and that the workflow as a whole produces the desired outcome.
- Deploy the Workflow: Once the workflow has been tested, deploy it to automate the task.
Frequently Asked Questions:
Can I include conditional logic in a multi-step workflow?
Yes, you can include conditional logic, such as IF Conditions, in a multi-step workflow in viaSocket. This allows you to create dynamic workflows that respond to different conditions.
Can I delete any particular step in a multi-step workflow?
Yes, you can easily delete any step from the multi-step workflow by selecting the triple dot next to the step and then clicking the delete button.
How can I monitor the progress of a multi-step workflow?
viaSocket provides monitoring tools that allow you to track the progress of a multi-step workflow in real-time. You can view the status of each step, their execution time and the number of invocations involved.
Multi-Step Workflow
Nov 8, 2024
In viaSocket, team collaboration revolves around 'Workspace'. These are like virtual folders where tasks and team members are organized. You can have multiple workspaces for different projects or teams. Switching between them is easy. Members access projects within their workspace. This setup makes collaboration smooth and team management efficient in viaSocket.

Workspace:
What is an ‘Workspace’ in viaSocket?
Workspace in viaSocket is a virtual entity similar to a company, school or any group that you want to manage. It acts as a container for your workflows, allowing you to group related tasks and users together.
How do I create a new workspace?
Creating a new workspace in viaSocket is simple. Just click on the "create new workspace" button on the dashboard and type the desired name for your Workspace and then click on "create new workspace". And in this way, your workspace is created.

Can I have multiple workspaces in viaSocket?
In viaSocket, users have the flexibility to create multiple workspaces, and there is no specified limit on the number of workspaces that can be established. This allows you to manage different groups or projects separately, keeping their workflows and members organized and distinct.
Can I switch between different workspace in viaSocket?
Yes, you can switch between different workspace in viaSocket. This allows you to work on different projects or groups without any confusion, as each workspace is kept separate from the others.
Members:
What are ‘Members’ in viaSocket?
Members in viaSocket are the one who are allowed to access the projects of a particular workspace. Adding members to your workspace in viaSocket enables you to collaborate more effectively with your team.Step by step guide on how to add Team Members in viaSocket for collaboration
How to invite members?
To add a member to your workspace in viaSocket, you need to navigate to your workspace's section on the platform. Here, you'll find an option of ‘Members’. You can find the list of all members who are currently accessing the Workspace and can also invite new members by simply entering their email ID. This feature allows you to invite colleagues or team members to join your workspace on viaSocket, facilitating collaboration and team management within the tool.

Team Collaboration
Nov 8, 2024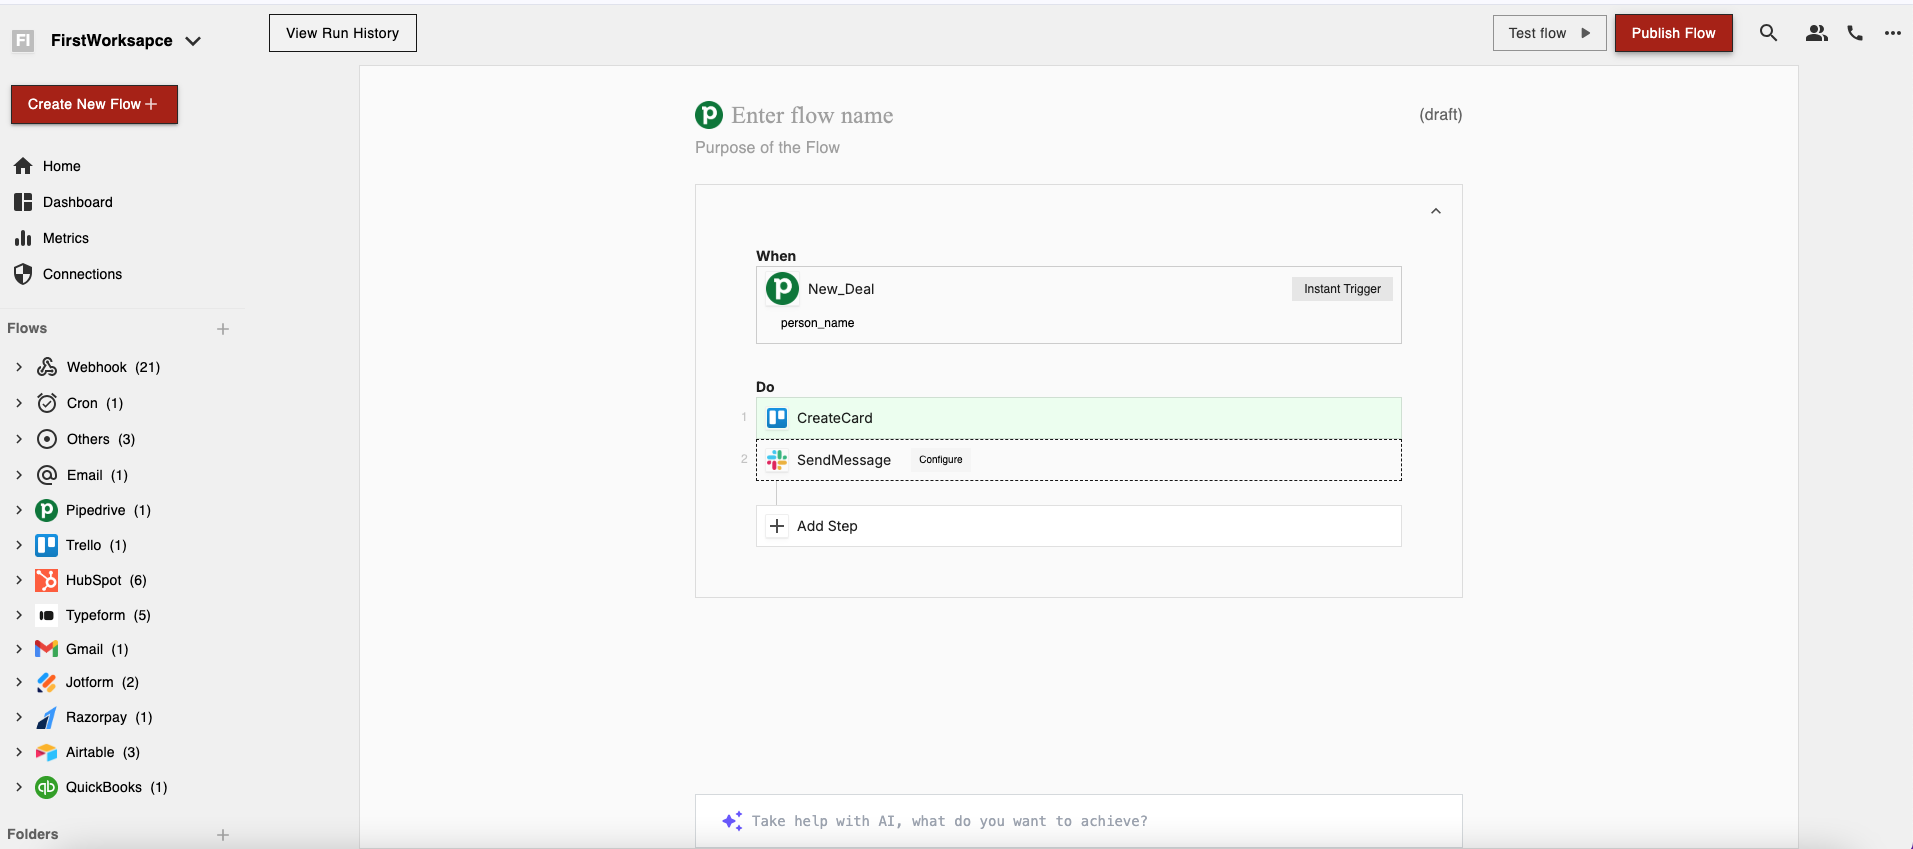
The workflow automation in viaSocket relies on a Chip format for mapping data. Chips in viaSocket are placeholders that store and update data dynamically within the workflows. Think of them as containers that hold information such as text, numbers, or even more complex data structures.

Chips as Data Placeholders
Chips act as placeholders where you specify where you want to map data from API calls within a workflow. They provide a way to dynamically update and organize data received from APIs during the workflow process. Each chip represents a specific piece of data that will be filled in as the workflow progresses.

Mapping Data in Workflow
When setting up a workflow, you can designate where each piece of data from the API should be placed using these chips. This mapping ensures that data flows smoothly from one step to the next within the workflow, following the specified logic or rules.
For example, let's consider a scenario where a company uses workflow automation in viaSocket to manage employee onboarding. Information about the new employee is collected through an online form and stored in chips within the viaSocket.
Usage of Chips:
Each chip represents a specific piece of information about the employee, such as name, email, position, department, and start date.
These chips are mapped to corresponding fields in the company's employee database and other internal systems.
For example, the chip labeled "Employee Name" is mapped to the field for the employee's name in the HR database.
Similarly, the chip labeled "Department" is mapped to the department field in the company's organizational chart.
Dynamic Data Updates
As the workflow progresses and APIs start sending data, the chips dynamically update with the actual data received. This allows for real-time processing and manipulation of data within the workflow based on the information provided by the APIs.
For example, let's say you're using viaSocket to automate your sales process. You've set up a workflow where whenever a new lead is added to your CRM (Customer Relationship Management) system, an email is sent to the sales team.
Now, imagine you want to add a personal touch to the email by including the lead's name in the subject line. You can easily extract the lead's name from the data stored in the chip generated from the CRM API call. Then, you just have to insert this chip into the subject line of the email by simply clicking on Use it.
Now, every time a new lead is added to the CRM, the email subject line will dynamically include the lead's name, adding a personal touch to your communication.
Utilization Across Workflow Steps
The data captured in chips can be utilized across all steps of the workflow. This means that once data is mapped into a chip, it becomes available for use in subsequent steps or actions within the workflow.
In essence, chips serve as dynamic placeholders for data within workflows, enabling seamless integration and manipulation of data received from APIs across various steps of the workflow.
How to Map Data in viaSocket
Mar 12, 2025viaSocket allows you to integrate over thousands of apps for workflow automation. Custom Integrations in viaSocket empower users to create tailored workflows that meet their specific needs. If the app is not directly available in viaSocket, users can use the APIs or Webhooks to connect multiple apps.
With Custom Integrations viaSocket provides:
1. Enhanced Connectivity: Users gain access to a vast library of popular apps and services across various domains, such as project management, customer relationship management (CRM), communication, finance, and more. A variety of connectivity options are available from viaSocket, each specifically designed to satisfy different business needs.
2. Tailored Solutions: Custom Integrations give users the ability to integrate their own APIs in addition to the apps that are already available, allowing them to modify the platform to meet their unique needs. This feature is especially beneficial for individuals whose unique workflows or proprietary systems require custom integration with specialised tools or internal software solutions.
3. Scalability and Future-Readiness: The Custom Integrations feature offers a flexible integration framework that guarantees scalability and future-readiness as businesses grow and incorporate new technologies. Whether integrating with emerging apps or upgrading existing systems, users can easily create their own plug-ins using our inbuilt plug-in builder and can extend the platform's capabilities to meet evolving business requirements.
Custom Integrations isn't just a feature – it's a gateway to a world of endless possibilities. Whether you're streamlining your operations, automating tasks, or crafting your ideal workflow.
FAQs
Is there support available for Custom Integrations?
Yes, we provide comprehensive support for Custom Integrations. Our dedicated support team is available to assist you with setup, troubleshooting, optimization and any other questions or concerns you may have. Additionally, we offer resources to help you make the most of your integrations.
Custom Integrations
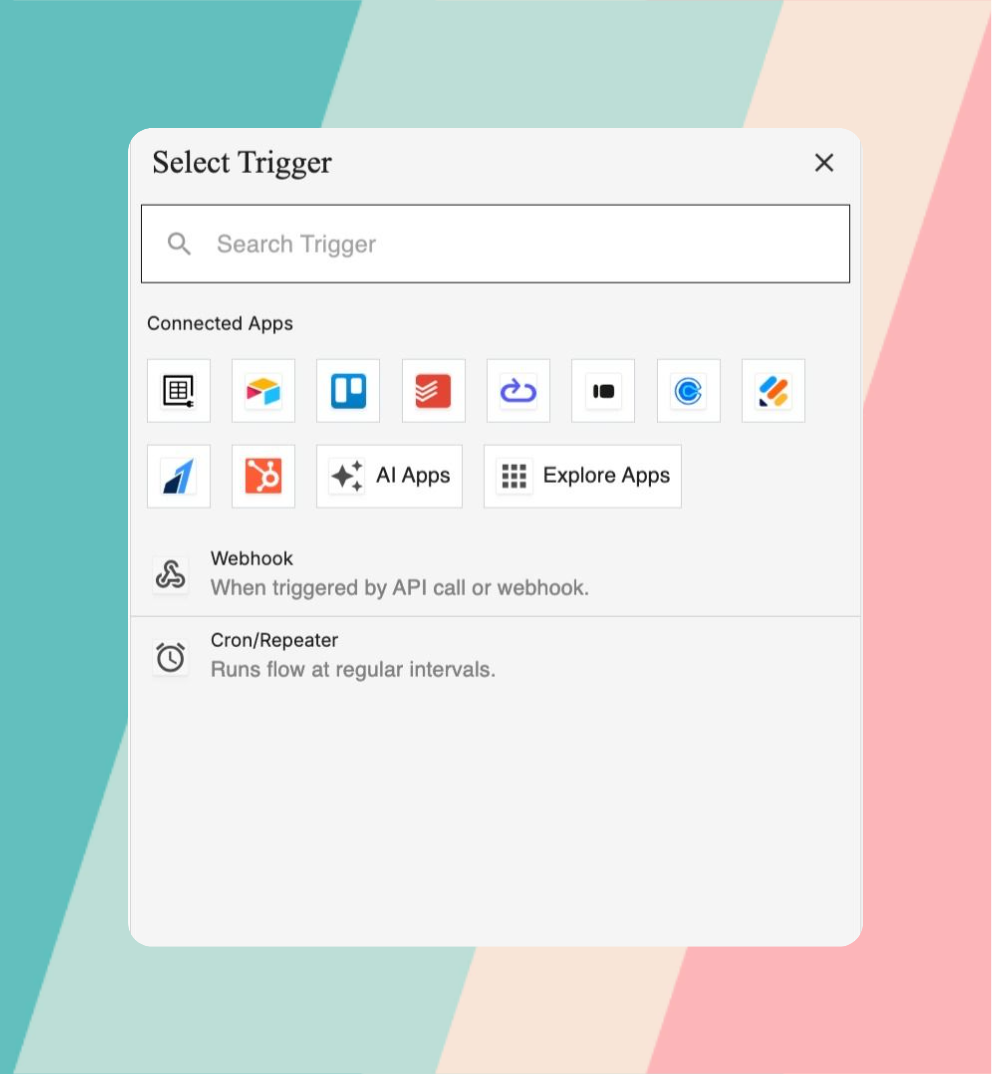
Mar 12, 2025Triggers kick off the entire Automation by responding to a specific event or condition. When the trigger event or condition occurs, viaSocket detects it.
Instant triggers initiate actions immediately upon the occurrence of a specified event. These triggers provide near-instantaneous responses to events within integrated applications.
 At the core of Instant Triggers lies the concept of webhooks. Unlike traditional APIs where you periodically poll for updates, webhooks are HTTP callbacks initiated by events. When an event occurs, such as a form submission or a new record creation, the corresponding webhook sends a payload of data to a predefined URL. viaSocket seamlessly integrates with webhooks, allowing users to create automation workflows triggered by real-time events.

How Instant Triggers Work in viaSocket:
- Let's consider a scenario where you choose an instant trigger to trigger your workflow through an app integrated with our platform.
For example, you want to trigger a workflow whenever a new deal is created in Pipedrive. - So, whenever a new deal is created in Pipedrive, it triggers a webhook, sending relevant data (such as the deal’s details) to your flow in viaSocket.

- viaSocket receives the webhook payload, interprets the data, and initiates the workflow that you set up, such as creating a new task in a project management tool or sending an acknowledgement email to the customer.
- The automation workflow executes instantly, ensuring prompt response to the new deal created in Pipedrive without any manual intervention.
📌 More examples:
- Instantly sending a notification when a new email arrives in the user's inbox.
- Automatically updating a CRM record as soon as a new lead is captured on a website.
- Instantly triggering an action in response to a customer's interaction with an online form.
Each application's API defines the type of triggers it supports. Most APIs offer methods for polling data, for applications to support instant triggers, they must offer webhooks.
In essence, viaSocket adheres to the capabilities provided by each application's API to determine the type of triggers available for automation. If an application supports webhooks, viaSocket can leverage instant triggers for real-time automation, whereas applications without webhook support will rely on polling triggers to periodically fetch updates.
Instant Triggers
Nov 8, 2024A workflow is an automated flow of processes that you wish your apps to perform on their own so that you don’t have to switch between different apps and do manual data entry.
📌 For example, when a customer submits a contact form on your website, their details are automatically added to your CRM for follow-up. They also receive a prompt thank-you email, enhancing your customer engagement process.
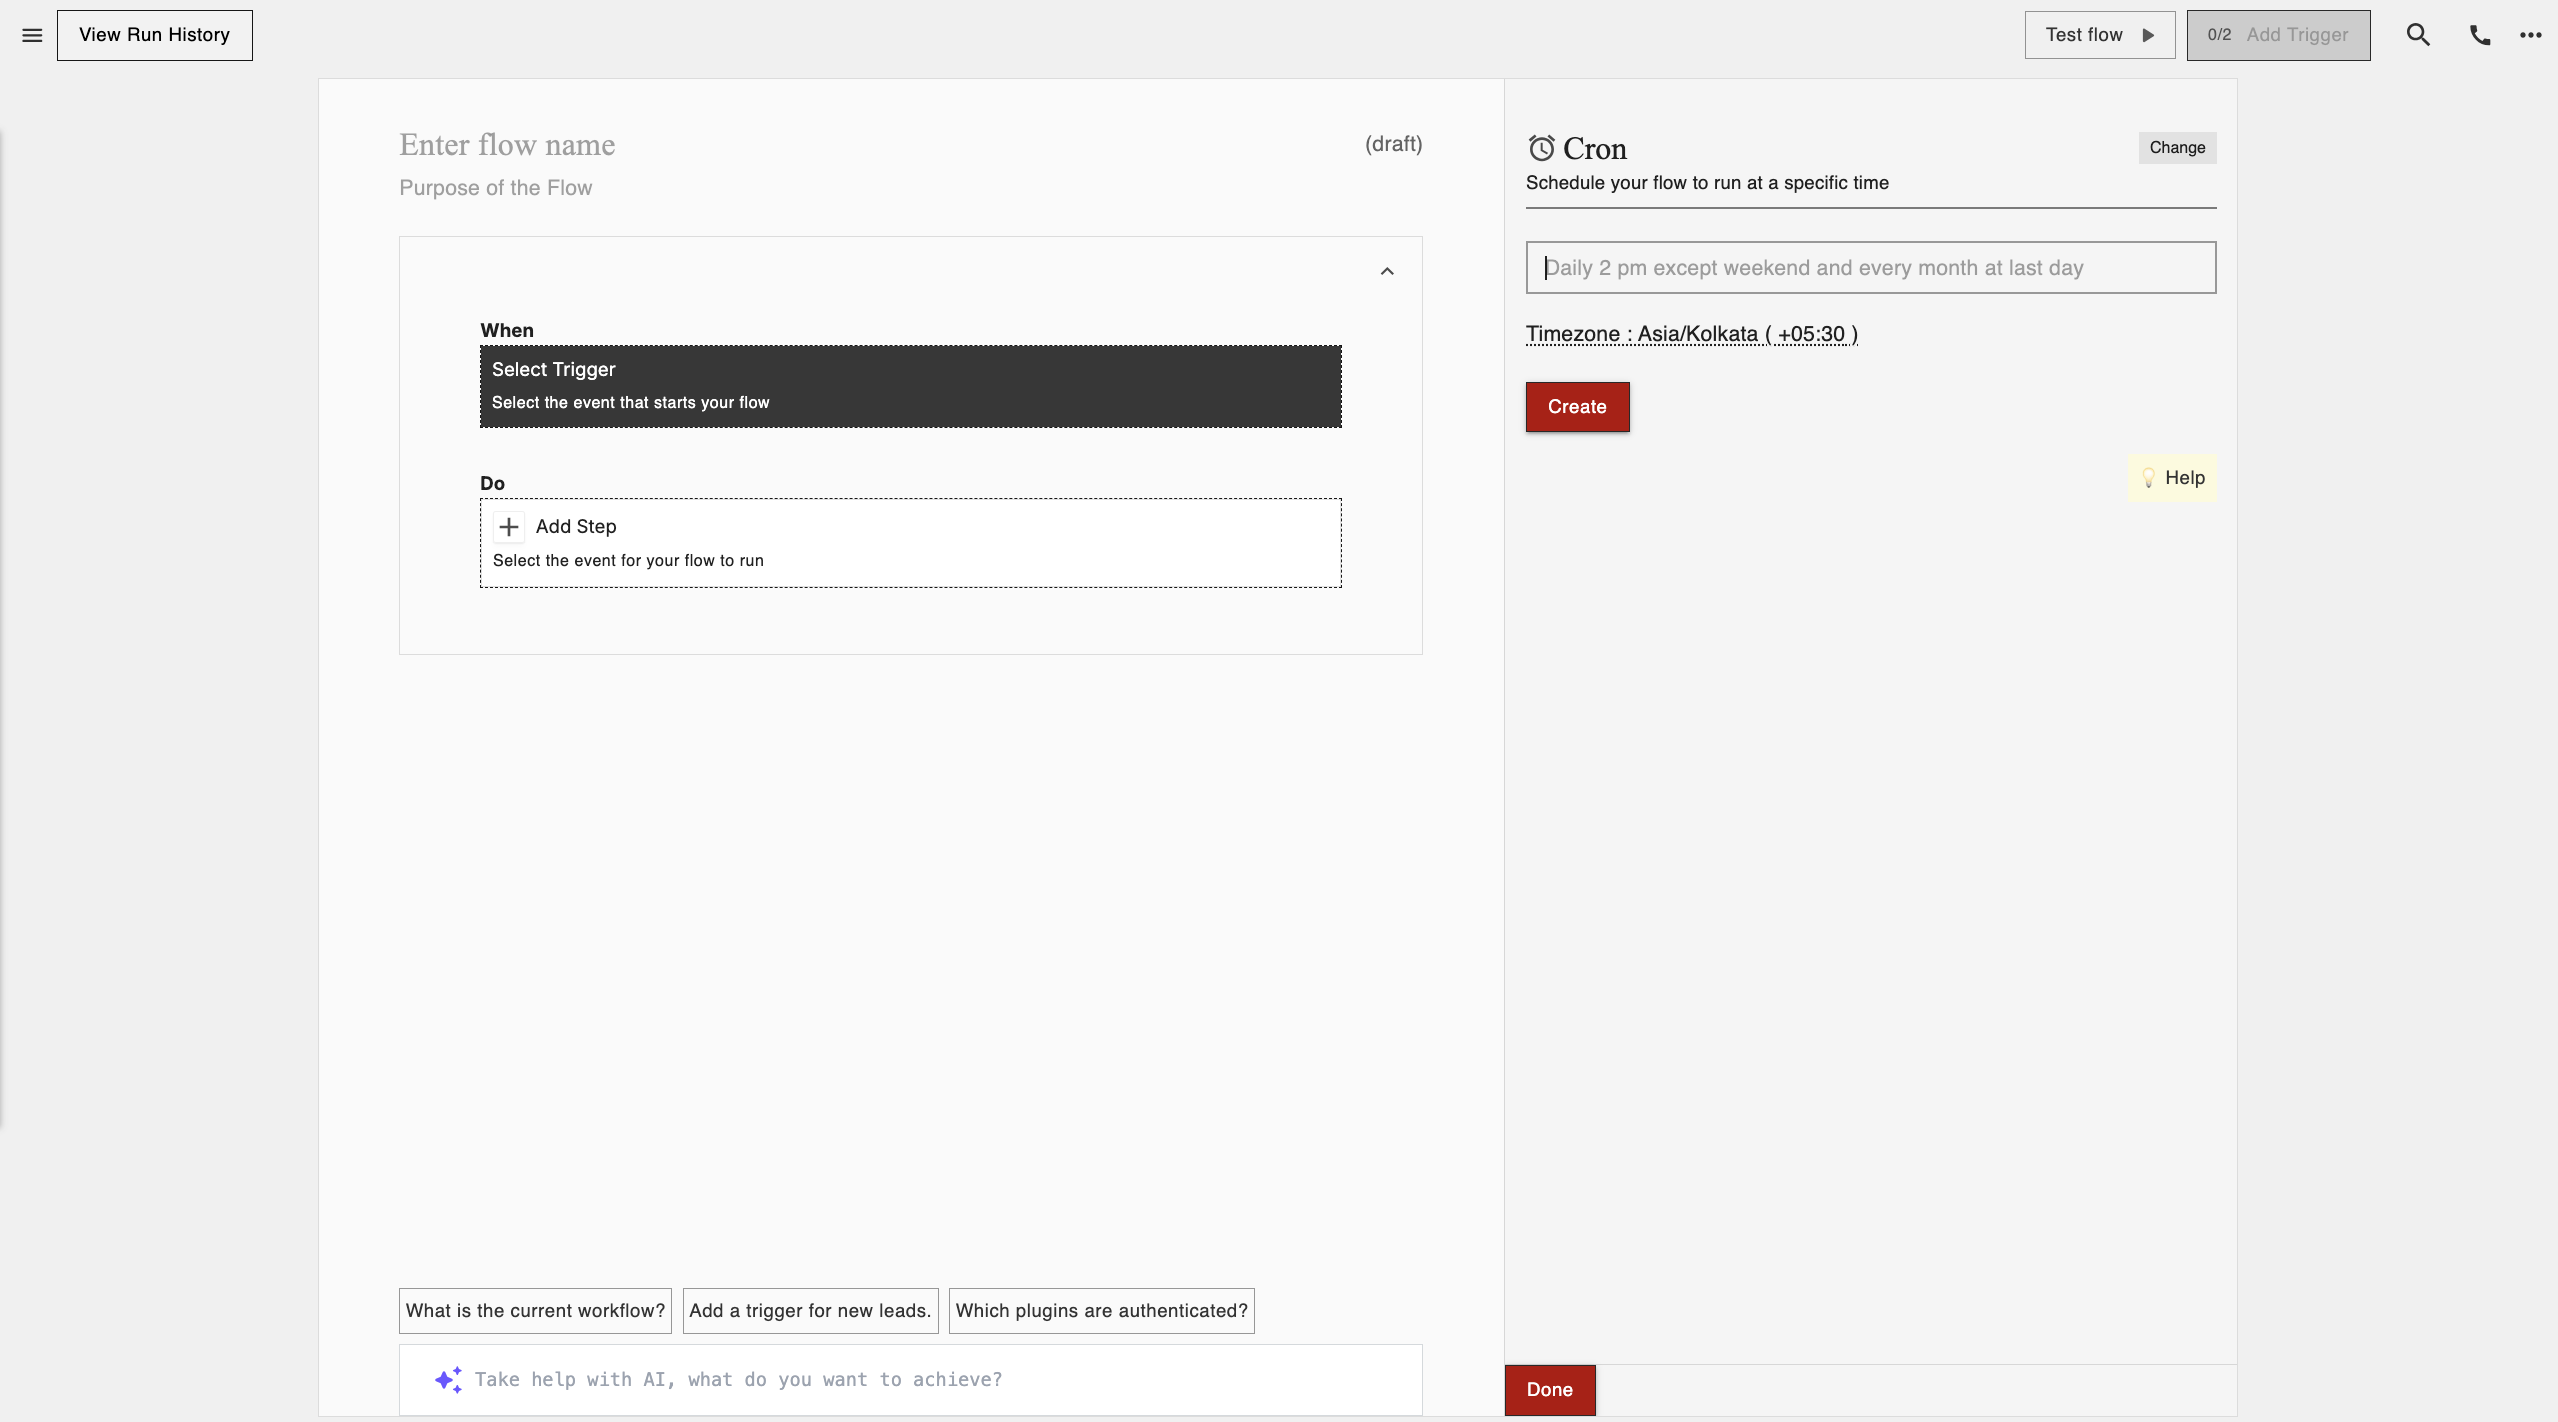
 To create a flow in viaSocket, you have to go through these basic steps:
- Choose your Trigger
- Set up your Action(s) steps
- Map data
- Make Live or Publish
Step by Step guide to create a flow to send Slack channel message for new Typeform entry
1. Choose your Trigger
The first step in creating a flow with viaSocket is to choose a trigger. A trigger is an event that sets your automation in motion. It could be anything from receiving an email to a new entry in a spreadsheet or a new follower on social media.
Triggers in viaSocket are of two types:
Let's walk through the steps of creating a flow in viaSocket using an example of integrating Notion and Slack.
Imagine you're a project manager using Notion to organize tasks and track project progress. Your trigger could be "New Database Item Created" in Notion. This trigger will initiate the automation process whenever a new item is added to a database, indicating a new task or project milestone.
- Trigger: "New Database Item Created" in Notion.

Once you've chosen your trigger, it's time to set up the action steps that you want viaSocket to perform in response to that trigger. Actions can range from sending an email, creating a task in your project management tool, updating a spreadsheet, or even posting on social media.
You can choose from a vast library of viaSocket to integrate any application that you want.
You can add multiple action steps to a single flow, allowing for complex automation sequences. Additionally, you can also incorporate conditions to ensure that certain actions are performed only when specified criterias are met.
Continuing with our example, nextstep would be to define the action step you want viaSocket to perform in response to the trigger. In this scenario, your action step might be "Send Message to Slack Channel." This action will automatically notify your team in a designated Slack channel whenever a new item is created in the Notion database, ensuring everyone stays updated on project developments.
- Action Step: "Send Message to Slack Channel."

Mapping data involves defining how information flows from one application to another in your automation. You'll need to specify which data from the trigger event should be used in your action step.
viaSocket uses chips to map data in workflows. Once you integrate an app with viaSocket, it stores the incoming data from those apps in these chips.
Let’s see it in our example, how to map relevant data from Notion to Slack, such as the title of the new database item and any associated details or deadlines. This mapping ensures that the message sent to the Slack channel provides clear information about the new task or milestone, enabling team members to take appropriate action.
- Data Mapping: Map item details such as title and deadlines from Notion to Slack.

4. Make Live or Publish
The final step is to publish your workflow by clicking on Make Live. By publishing the flow, you enable it to run automatically whenever the trigger conditions are met, initiating the defined actions without requiring manual intervention. This ensures that your workflow operates seamlessly and efficiently, saving you time and effort in executing repetitive tasks.
Once you've configured your trigger, action step, and data mapping, make your automation live. Activate the automation within viaSocket to start monitoring your Notion database for new item creations. Whenever a new item is created, viaSocket will automatically send a message to the designated Slack channel, keeping your team informed and aligned on project updates.
- Make Live: Activate the automation to notify your team in Slack whenever a new item is created in the Notion database.
By automating this process, you can streamline task management workflows, improve communication among team members, and ensure timely completion of projects.
viaSocket offers a user-friendly interface and powerful automation capabilities to help you streamline your workflow and boost productivity. Whether you're automating customer communications, data entry, or task management, viaSocket makes it easy to create customized workflows tailored to your specific needs.
Step By Step Guide
Nov 8, 2024

Let say you have created a flow but you want to rearrange your step. Well, no worries, just click on the left side of your step, four dots will appear, hold it and just drag and drop it where you want to place it.

Just make the flow live and your sequence of flow execution steps get changed. Below you can see the drag button. So just hold that drag button and drag your step in the flow wherever you want.
In viaSocket, rearranging steps within your workflow offers several benefits:
With a simple click and drag, users can effortlessly adjust the sequence of steps in their workflow.
The ability to rearrange steps provides users with the flexibility to customize their workflow according to their specific requirements.
Users can quickly modify their workflow without the need for complex technical knowledge or extensive training.
Changes made to the workflow sequence are instantly reflected, allowing users to see the impact of their adjustments in real time.
By easily rearranging steps, users can optimize their workflow for efficiency, ensuring tasks are executed in the most logical order.
The intuitive drag-and-drop functionality promotes collaboration among team members, enabling them to easily communicate and coordinate changes to the workflow.